Wednesday, 13 May 2020

Understanding and Configuring the Logging Driver on a Docker Host

Logging Drivers on Docker are pluggable components which all you to access and pull log data out of containers running on a Docker host. Many Logging Drivers exist for Docker, but the default and most common is known as "json-file". This is set as the default on a newly installed Docker host.

It is possible to change the default Logging Driver by editing the following file:

/etc/docker/daemon.json

Please note that a new file will be created if this does not already exist with custom settings 

sudo vi /etc/docker/daemon.json

Add the following code block in JSON format to set the Logging Driver to "json-file" for the entire Docker host. 

{
  "log-driver": "json-file",
  "log-opts": {
    "max-size": "15m"
  }
}

The "log-opts" switch is another way for us to control the Logging Driver, and the subsettings depend on the driver itself. Above we have set "log-opts" to "max-size" which sets a max log file size to 15MB's.

Once you have made the code changes to the daemon.json file, commit and save the file. You must restart the Docker services before the changes will be pharsed. To do this run the following command:

sudo systemctl restart docker

Depending on whether you are running Docker EE or CE edition will depend on the Logging Drivers available to you. 

In Docker EE you have the following drivers available: 
  • syslog
  • gelf
  • fluentd
  • awslogs
  • splunk
  • etwlogs
  • gcplogs
  • Logentries
However in Docker CE edition the options are more limited:
  • local
  • json-file
  • journald
The information above demonstrates how to set the Logging Driver at a global level across the entire host. It is possible with Logging Drivers to use different drivers on a per-container basis.

To do this use the -log-driver switch with the docker run command. For example:

docker run --log-driver json-file --log-opt max-size=50m hello-world

Tuesday, 12 May 2020

Audit Docker Security with CIS Benchmark Script

The following Git Hub repo includes a script which checks against dozens of common best practices related to securing Docker. 

https://github.com/docker/docker-bench-security

It is worth running this to get an understanding of your Docker environments security posture. 


Step 1: Clone the repo on your Docker host

git clone https://github.com/docker/docker-bench-security.git

Step 2: cd to the directory

cd docker-bench-security

Step 3: run the script (this runs the entire script)

sudo ./docker-bench-security/sh

Step 4: review the output


It is also possible to target certain aspects of a Docker deployment, such as doing a targeted scan of the Docker host configurations.

To do this run the script with the following switches:

This command runs checks againest the Docker hosts itself. 

sudo ./docker-bench-security.sh -c host_configuration

The other targeted tests are shown below. Just substitued the test name into the above command. 


Tuesday, 14 January 2020

Windows Virtual Desktop: Create Custom Windows 7 Image for WVD

Windows 7 is still very much alive in the enterprise, regardless if today is the last day Microsoft officially supports the legacy operating system. Announced in September 2019, Windows Virtual Desktop allows customers to run a fully managed VDI environment from Azure. The underlying technology is similar to Remote Desktop Service we have had in Windows Server since 2012 but the new Azure service abstracts all of the actual components which make it work. In other words you no longer have to manage RD Session Hosts etc with WVD.
Customers who have not yet managed to migrate away from Windows 7 are effectively exposed as new security updates will no longer be released for Windows 7 (unless you have a side agreement with Microsoft). However, when WVD was announced it was made clear that Windows 7 as an operating system would be supported in WVD deployments. In addition to this Microsoft are providing free Extended Security Updates (ESU) to customers running Windows 7 as part of their WVD deployment.
Although it is very straight forward to get a Windows Virtual Desktop deployment up and going a few steps are required if you would like you WVD Host Pools to spin out VM's running Windows 7. By default, it is only possible to create Host Pools with later operating systems such as Windows 10 Enterprise Multi-Session.
The process to make Windows 7 available to your WVD users is straight forward. You must create a customer "managed" image in Azure to be used as a reference template when creating a new WVD Host Pool.
The easiest way to do this is to deploy a new Windows 7 VM directly into Azure, install your apps and do any customisation, then convert it to an image. It is possible to do something similar if for whatever reason this won't work for you. The process would be to build a reference Windows 7 image on premise, probably on Hyper-V and run through the steps outlined in this guide https://docs.microsoft.com/en-us/azure/virtual-desktop/set-up-customize-master-image
Step 1: Create a new Windows 7 VM
This is very simple, use the poral to provision a new Virtual Machine, selecting Windows 7 Enterprise as the source Image.

Windows 7 Enterprise is not in the quick drop list of operating systems, if you search for it though you will find that there is a single image available. 

Step 2: Install Apps and Make Customisations
Once the VM has deployed, login to it and install any applications, or make any customisations. It is worth noting that some applications need further configuration to make them user-ready at first launch, this would be addressed on a per-application basis.

Step 3: Run SysPrep to Generalise the VM
The SysPrep tool has been around in Windows since before WDS, I think it first appeared in Windows Server 2003 with the introduction of Remote Installation Service (RIS). Anyway it has not changed since, it is a tool used to generalise (strip any machine specific metadata away from a Windows installation) to aid Windows imaging. If you fail to SysPrep you VM images you will have nothing but boot problems and instability.
Open an elevated Command Prompt and cd C:\Windows\System32\sysprep

Select the options shown below Enter System Out-of-Box Experience (OOBE) and ensure Generalize is ticked. You also want to ensure the VM is powered off after this process has completed, if not it will boot and begin detecting all the hardware and run the OOBE process.

The SysPrep process should complete in a few minutes and leave you with a clean, generalised VM ready to be converted into an image. 

Once the process has completed you will see the VM has entered the Stopped (Deallocated) state from the Azure Portal.

Step 4: Convert Windows 7 Image to Azure Image
Once we have the template ready click into the Virtual Machine from the Portal and click the Capture button. This will begin the process of converting the VM to an Azure Managed Image. 

The wizard will walk you through creating a new image, ensure that you give it a descriptive name. The name of the Azure Managed Image will be required when creating your WVD Host Pool along with it's Resource Group. You will notice the option to delete the VM once the template has been created, in this example I have chosen to select this option. However, in production you might want the template in place so that you can do some online servicing of the image as time goes on. 

Once the process completes you will have a new image available from the Portal. You can view all images if you search for Images in the global search bar.

Step 5: Create Windows Virtual Desktop Host Pool from Windows 7 Managed Image
The next step is to create WVD Host Pool, this can be done by searching for WVD in the poral and selecting Create.

You must have a number of infrastructure components in place before you can deploy a WVD Host Pool. This includes a WVD tenant, AD DS domain, AAD tenant with M365 licenses with all the associated networking. When you create a WVD Host Pool the creation must be able to join your WVD Session Hosts to an Active Directory domain.
From the wizard I have labelled the Host Pool "win7-personal" and selected the type as Personal. This outlines that users will maintain a 1:1 mapping with a dedicated Azure VM running Windows 7, which is created from this template. It is also possible to create Pool WVD Host Pools but there is limited value in doing this with Windows 7. By default, Windows 7 can only support 2 concurrent login sessions. This has been true of all desktop operating systems from Microsoft until the release of Windows 10 Enterprise Multi-Session, with is designed to allow pooled desktops to be created from a Windows 10 image.

On the Virtual Machine Settings tab, instead of taking the default of selecting a Gallery image, click on Managed Image. This will then present two new fields for the Azure Managed Image name, along with the Resource Group that the image is in. 

Monday, 13 January 2020

Azure Network Watcher: the default "NetworkWatcherRG" Resource Group is just irritating (how to change it)


If you are like me and insist on keeping your Azure subscriptions nice and tidy, with consistent naming of resource groups the default “NetworkWatcherRG” resource group is bound to annoy you.

Network Watcher is a region level service which can be used to troubleshoot network connectivity between your Azure resources. If you do not want the “NetworkWatcherRG” resource group making things look untidy, the trick is to create the instance of Network Watcher manually using Azure CLI or PowerShell.

The example below creates a Network Watcher instance for UK South in a designated resource group.

az login

az network watcher configure --resource-group "rb-core-rg-1" --locations uksouth --enabled

Tuesday, 3 September 2019

How to publish RemoteApps on Windows Virtual Desktop using Powershell

To publish RemoteApps on Windows Virtual Desktop, you must create a dedicated Host Pool for RemoteApps. It is not possible to coexist RemoteApps with full desktops. This was the same in legacy Remote Desktop Services. I have already created a new Host Pool using the Portal called “hostpool2”, please note for RemoteApps you must create the host pool with a server operating system.

Use the following command to authenticate to the WVD tenant.

Add-RdsAccount -DeploymentUrl https://rdbroker.wvd.microsoft.com

Use the following command to create a new RemoteApp Group.

New-RdsAppGroup -TenantName "Tenant Name" -HostPoolName "hostpool2" -Name "Demo"

Use the following command to display all the available applications on the host pool VM’s. This command displays 3 variables which are required for the New-RdsRemoteApp command.

1 – App Name: the name of the application
2 – Icon Path: the icon path on the local system to be displayed as part of the published app.
3 – File Path: the raw file path of the exe of the app to be published.

Get-RdsStartMenuApp -TenantName "Tenant Name" -HostPoolName "hostpool2" -AppGroupName "Demo"

Take the info which was displayed in the last step to complete the New-RdsRemoteApp command.

New-RdsRemoteApp -TenantName "Tenant Name" -HostPoolName "hostpool2" -AppGroupName "Demo" -Name "Calculator" -FilePath "C:\windows\system32\win32calc.exe" -IconIndex "0"

Use the Add-RdsAppGroupUser command to grant permissions to users or groups.

Add-RdsAppGroupUser -TenantName "Tenant Name" -HostPoolName "hostpool2" -AppGroupName "Demo" -UserPrincipalName "user1@domain.com" 

Friday, 30 August 2019

How to clean up Windows Virtual Desktop tenant deployment using PowerShell

If you have been experimenting with Windows Virtual Desktop you may notice that old tenants that were created still show under the WVD Tenant management portal. These show even if the Host Pool has been deleted from the Portal. The following set of commands can be used to delete the tenant so that it no longer showers in the management portal.


Use Get-RdsSessionHost to find the name of the old Session Hosts.

Get-RdsSessionHost -TenantName "Windows Virtual Desktop Betts" -HostPoolName "host-pool1"

Use Remove-RdsSessionHost to delete the Session Hosts, this needs done even if you have deleted the Host Pool from the Portal.

Remove-RdsSessionHost -TenantName "Windows Virtual Desktop Betts" -HostPoolName "host-pool1" -Name "hoa-wvd--0.domain.com" -Force

Use Remote-RdsHostPool to delete the Host Pool, again this need done even if it’s been deleted from the Portal.

Remove-RdsHostPool -TenantName "Windows Virtual Desktop Betts" -Name "host-pool1"

Use Remove-RdsTenant to delete the old tenant so that it no longer shows in the WVD management portal.

Remove-RdsTenant -Name "Windows Virtual Desktop Betts”

Thursday, 29 August 2019

Windows Virtual Desktop - New-RdsTenant throws error "User is not authorized to query the management service." due to Azure AD permission error.

When you try to create a new Windows Virtual Desktop tenant you run the command

New-RdsTenant -Name "Windows Virtual Desktop Betts" -AadTenantId "xxxxx" -AzureSubscriptionID "xxxxxx"

And are faced with the error "New-RdsTenant : User is not authorized to query the management service.". This is due to a permission configuration problem on Azure AD. 

Before you get to the stage of creating a new WVD tenant you must complete the consent process to grand access to your AAD tenant, this can be done here https://rdweb.wvd.microsoft.com/

Once it is done you will notice two new objects under Enterprise Applications for Windows Virtual Desktop, click on the first one. 


You must add a new user account with TenantCreator permissions before you can create a new WVD tenant. Please note that the Global Admin account for the directory does not work, it must be TenantCreator. 


Once you have a TenentCreator, ensure you authenticate to your directory at the Add-RdsAccount stage using this account before you attempt to create a new WVD tenant. This is where you will be faced with "User is not authorized to query the management service." even if you use a Global Admin account. 

Tuesday, 13 August 2019

Setting Azure variables in Windows for Terraform authentication

It is possible to store the environment variables for your Azure in the Windows profile of the machine you are using Terraform from. This prevents the need to store sensitive variables in your Terraform code. The first step is to create new Environment Variables under Windows, in this example I'm using Windows 10 Enterprise. 

The important thing here is what you label the variables, the Terraform program looks inside the Windows profile for the prefix "TF_VAR_" and the suffix must be exact to match the syntax of what Terraform is expecting for example in Azure Active Directory the service principal is called an "application id", Terraform does not understand this as it's looking for "client_id".

Azure Value
Terraform Expects
Windows Variable String
Application ID
client_id
TF_VAR_client_id
Client Secret
client_secret
TF_VAR_client_secret
Tenant ID
tenant_id
TF_VAR_subscription_id
Subscription ID
subscription_id
TF_VAR_tenant_id


Use the following Azure CLI code to authenticate to Azure using the variables:

az login --service-principal -u %TF_VAR_client_id% -p %TF_VAR_client_secret% -t %TF_VAR_tenant_id%

Wednesday, 30 January 2019

Configure NLB Nodes for WAP (non domain joined)

You might run into some node-level trust issues if you are trying to configure an NLB cluster for the Web Application Proxy role. 


The best practice from Microsoft states that any servers running the Web Application Proxy role should reside in a DMZ network and not be domain joined. This brings it's own set of issues as the nodes don't automatically trust each other. 

Gone are the days of creating two local administrator accounts on two non-domain joined hosts with the same password and praying it "passes through" authentication requests. Although we are still going to do this, a few other steps must be completed for it to work. 

If you are configuring an NLB cluster on none domain joined nodes, you will probably be faced with "Access Denied" when you attempt to add the second host to the already existent cluster. This is even if you have matching local administrator credentials on both machines. I'm led to believe this is due to later versions of Windows inspecting the local SID's of user accounts instead of the username string. 

To resolve this do the following - 
  • Create a new DWORD entry for LocalAccountTokenFilterPolicy in the registry of both nodes, this disables certain parts of UAC.  The registry path is HKEY_LOCAL_MACHINE\SOFTWARE\Microsoft\Windows\CurrentVersion\Policies\System and for clarity the new entry should be a DWORD set to decimal and the value of 1.
  • Configure (from NLB Manager) Options > Credentials on both servers with the local admin account that has been created on each of the servers.
  • Configure the NLB cluster using node IP's and not DNS names (even if you have DNS names configured with the hosts file, I've found IP's seem to work better in a none domain joined NLB cluster).

Tuesday, 22 January 2019

DirectAccess reports Error: there is no valid certificate to be used by IPsec which chains to the root/intermediate certificate configured to be used by IPsec in the DirectAccess configuration." when device-certificates are enabled

The amount of accurate documentation on how to implement device-certificate based authentication for Direct Access clients is extremely low. If you’re implementing Direct Access from scratch I would recommend getting it working with AD credentials only, then enable device-certificates once you are confident in the general config. I recently did just this, the Direct Access server and clients were functioning correctly. The next stage was to enable Computer Certificates from Step 2 – Remote Access Server.

In my lab I only have a single tier AD CS PKI setup, therefore I selected Use Computer Certificates but did not tick Use an Intermediate Certificate. This would be required if you had a two-tier AD CS PKI.

For clarity at this point you should choose the certificate that is that is issued by your Certificate Authority. It is unclear what else is required to make IPsec work correctly. 


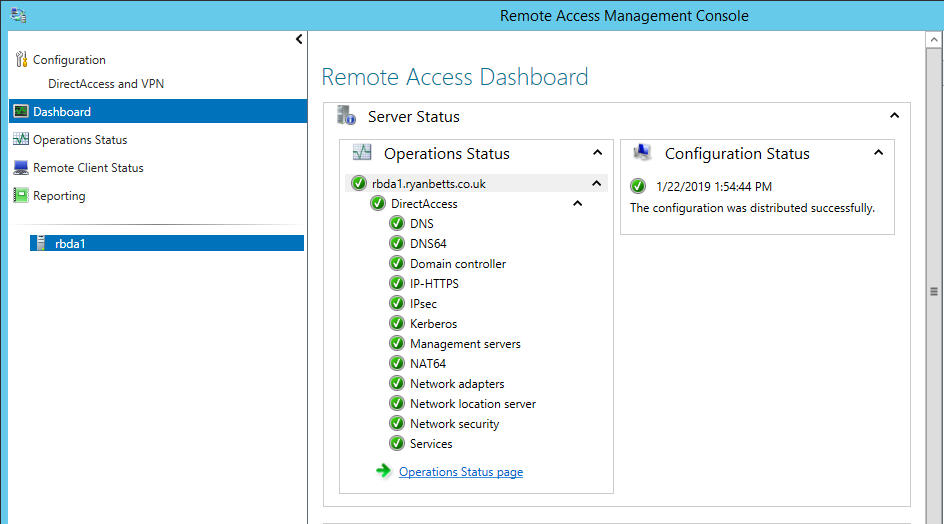
Once you do the above, and Group Policy refreshes you will start getting an error about IPsec not working. 

“Error: there is no valid certificate to be used by IPsec which chains to the root/intermediate certificate configured to be used by IPsec in the DirectAccess configuration.”

“Causes: the certificate has not been installed or is not valid.”

“Resolution: please ensure that a valid certificate is present in the machine store and DA server is configured to use the corresponding root certificate.”


The reason for this error is that a suitable certificate is not installed on the Direct Access server, this might seem obvious. However, the configuration step from Direct Access Step 2 – Remote Access Server does not install a certificate to make IPsec work, it simply points the Direct Access configuration at the PKI to trust for device certificates. 

With that said, you must configure a custom AD CS template with specific settings to make IPsec work for Direct Access, a certificate from this template then must be installed on all of the Direct Access servers.

To do this open up Certification Authority and click Certificate Templates.


Open Manage from Certificate Templates.

Find the default Certificate Template called RAS and IAS Server, right click it and select Duplicate Template. 

On the General tab give your new template a descriptive name I also select Publish Certificate in Active Directory.


Click on the Security tab and add the context Domain Computers and grant the following permissions
  • Read
  • Enroll
  • Autoenroll 


Click the Extensions tab and click Application Policies, then Edit. 


Click Add from the Edit Application Policies Extension window.


Enter a descriptive text string for the new Application Policy, do not make any alterations to the Object Identifier and click OK. 


Do not forget to do a Certificate Template to Issue to ensure the new template is available for certificate enrolment. 


The next step to fix “IPsec is not working properly.” is to enroll a certificate on each of the Direct Access servers using the new template. It should be installed under the Computer context under the Personal store on each of the Direct Access servers. 


Once this certificate is installed do a gpupdate /force on each of the Direct Access servers, the IPsec errors should disappear.