Thursday, 30 July 2015

How to Configure Office 365 Multi Factor Authentication

Multi Factor Authentication can be attractive to businesses looking to migrate to Office 365, this allows administrators to enforce two methods of authentication on to users. This makes it harder for black hat hackers to compromise corporate data, this is mainly because stolen (or cracked passwords) will not be sufficient to gain access to the Office 365 services. In this example I am going to configure basic MFA with Office 365, there is more advanced features that can be utilized which I will explore in further posts.

Sign in to Office 365 as a Global Administrator, click Active Users and then click Set Up under Set Multi-Factor Authentication Requirements.

Select Users and then click Enable under the Quick Steps pane.

You will be asked to confirm if you want to enable Multi Factor Authentication, click Enable MFA to enable it.


Under the Service Settings tab, ensure Allow users to create app passwords to sign in to non-browser apps this will allow users to create app passwords to ensure they can still use full-functioning clients such as Outlook etc. These app passwords replace the standard passwords in Outlook profiles.


Now if you try to login to Office 365 as a user you will be prompted to complete the setup of MFA. Click Set it up now to continue.


Probably one of the easiest way to integrate MFA, in its most basic fashion with Office 365 is to link user account to company issued mobile phones. Select Authentication Phone and enter your Country Code and Mobile/Cell phone number. I have also selected Send me a code by text message. Click Contact Me.


Within seconds you will receive a 6 digit code from Microsoft.


The screen will automatically refresh allowing you to enter the 6 digit code, once you have done this click Verify.


Take note of this default app password and click Finished.


Now when you try to login as a user you will be prompted with a secondary authentication box for you to populate with the 6 digit code Microsoft will send every time you try to login. As I am connecting via a domain-joined computer ADFS and SSO has passed-through my standard network credentials leaving only the secondary authentication. If you were connecting from an internet computer you would have to enter both sets of credentials.


Another code is sent to my mobile phone to authenticate this login request.


The next step is to create app passwords to ensure users can use full-Outlook etc. Once logged into to Office 365 click on the Settings cog and select Office 365 Settings. You will be faced with this page, Click Additional Security Verification. 


 Click on the App Passwords tab.


Click Create and name the new app password something descriptive.


Office 365 will automatically generate a new app password for you. Select Copy password to clipboard and then Close.


It is within the Outlook profile you should populate with the newly create app password.


Wednesday, 29 July 2015

Remove ADFS federation and revert to Same Sign On with password sync after ADFS failure

Although AD FS can offer a much better user experience with Single Sign On to applications such as Office 365, it does have it's faults. For example if you have ADFS deployed and configured to provide SSO to Office 365, users are only able to authenticate to the Office 365 tenancy if the ADFS service is online. Therefore no ADFS, no Office 365, which means no Exchange, SharePoint etc. If your ADFS service goes offline and you still require access to Office 365 (which you likely are) the following procedure can be carried out to switch the Office 365 tenancy back to a "managed domain" which basically means it no longer relies on ADFS.
The DirSync configuration you choose here is important, it is recommended to enable Password Sync, this is so that users can login with their same username and password if you have to break the ADFS relationship. This is known as Same Sign On.

Lets first check the status of our ADFS and Office 365, so connect to it using PowerShell.

Use the Get-MsolDomain command to view if Federation is currently in operation. As you will notice it is for this environment. 

To simulate my ADFS service going offline I have down powered both the ADFS and WAP server, as you can see from VMware Workstation. 

Now if I try to login to Office 365 from a domain-joined computer using SSO it fails.


This is where it gets a little complicated, there are a number of commands on the internet that are supposed to do this, convert from a federated domain to standard. As you can see if you run the command Convert-MsolDomainToStandard -DomainName edin-networks.com -SkilpUserConversion $False -PasswordFile C:\Passwords.txt when ADFS is offline you will recieve the following error.

The work around here is to install and configure ADFS on any other server in the domain, in this example I have thrown the ADFS role onto a domain controller.

Run through the configuration wizard so that it mirrors the original ADFS setup, but don't forget this wont have the Relay Trust associated with Office 365. 


Once it is done use the following command;
Set-MsolDomainAuthentication –DomainName edin-networks.com –Authentication Managed


This command will convert the federated domain to an Office 365 manage domain, and if you have Password Sync configured with DirSync users should be able to login using their normal network passwords.
Run this command to verify that the conversion has carried out successfully.
Get-MsolDomain


Now lets test, as you can see my ADFS infrastructure is still offline, now browse to the Office 365 login page. It no longer directs me to the ADFS service name and I am free to enter my credentials.


The credentials that are valid will only the from the last DirSync, so if you DirSync has not worked for a while you may find some users have to use old network passwords. It is worth ensuring DirSync is managed and available as this procedure can be a good saving if your ADFS infrastructure fails. 

Office 365 access, ADFS failure, ADFS down, Office 365 authentication

ADFS Name Resolution Issue: Single Sign On Users are faced with the Sign In Page

This post is to document a known behaviour of ADFS 3.0 if your name resolution (DNS) is not configured correctly. If you attempt to sign in to Office 365 from a domain-joined Windows 8.1 computer (with all the SSO pre-reqs) you are faced with the following screen. The user is able to login correctly with their password, but this is not the desired experience.

It all pointed to name resolution and as this way my lab it did not surprise me (as it is a mess), so I first tested reverse lookups and as you can see it failed. 

The reverse lookup failed because there was not a PTR record created for my Domain Controller under my Reverse Lookup Zones, so I created it. The nslookup test then worked correctly.

As my Office 365 tenancy was using my lab domain edin-networks.com all of my DirSync'd users had their UPN suffixes set to @edin-networks.com. I had however forgotten to create the Forward Lookup Zone for this domain name. I created this under DNS and ensured it was integrated with Active Directory.

The next step was to create an (A) record that pointed to the ADFS service name (in this example sso.edin-networks.com) this should be set to point to your internal ADFS server. This is of course not valid for internet name resolution as you would resolve to the external IP of the WAP server.

Now attempt to ping the internal ADFS service, depending on your DNS configuration you may have to flush the cache first or you run the risk of this resolving to the external sso.domain.com

Attempt to login again and it works first time.

Tuesday, 28 July 2015

Configuring the Relying Party Trust between Office 365 and ADFS 3.0

If you currently have an ADFS infrastructure built the next step is to configure the relationship between Office 365 and your ADFS infrastructure. This is done with the following PowerShell commands.

PowerShell Remoting should be enabled and allowed on both the ADFS and WAP servers.
Enable-PSRemoting

You then must connect to the Office 365 tenancy, using this command. It is best to enter Global Administrator credentials that use the .onmicrosoft.com suffix. Refer to this blog post to see why;


Connect-MsolService

This then points to the ADFS server context, this should be the FQDN of the ADFS server if you are using a single server setup. If not it should be set to the server farm name, in which the appropriate DNS records should be configured.

Set-MsolADFSContext -Computer adfs.ryanbetts.co.uk

This command actually converts the Office 365 tenancy to use the ADFS for authentication.
Convert-MsolDomainToFederated -DomainName edin-networks.com

You can test that the settings have been applied correctly using this command.

Get-MsolDomain


You can also see that there is a Microsoft Office 365 Identity Platform under the Relying Party Trusts under your ADFS servers.


Convert-MsolDomainToFederated - ADFS "You cannot convert the specified domain to use identity federation because the account you are currently signed in with is a member of the domain. Please sign in to the service using an account that is a member of the company administrators

When you try to convert your Office 365 domain to federated in order to use SSO with ADFS you recieve the following;

"You cannot convert the specified domain to use identity federation because the account you are currently signed in with is a member of the domain. Please sign in to the service using an account that is a member of the company administrators."


This threw me at first but it was because I had authenticated to Office 365 using a Global Administrator account that was configured with my public domain suffix (edin-networks.com) in this example. The fix was to create a new Global Administrator user that was set to use the .onmicrosoft domain suffix.


Ensure the Global Administrator role is assigned to the user account.

Create your PowerShell connection and the Convert-MsolDomainToFederated command should work correctly.


Friday, 17 July 2015

Configuring AD FS Client Settings using GPO's

Updated - 24 August 2016

Requirements for SSO to Office 365 on a Windows 7 Enterprise PC;
·         Microsoft Online Service Sign-In Assistant (installed on PC)
·         The SSO service URL added to the Intranet Zone in IE
The Microsoft Online Service Sign-In Assistant can be downloaded from the following link;
It comes pre-packaged as an MSI so you can push it out through Group Policy, if you do not have a more modern software deployment mechanism such as SCCM etc. This installer basically adds a new service called Microsoft Sign-In Assistant to the PC, this service must be running for SSO to work correctly.

To configure the Intranet Zone either create a new GPO, or add the following settings to an existing GPO. 

Click on WMI Filters, right click and create a new WMI Filter.  Give it a descriptive name, in mine I have used "Windows 7 Filter".
The following query strings will ensure that only Windows 7 endpoints are given the GPO settings.
select * from Win32_OperatingSystem WHERE Version like "6.1%" AND ProductType="1" AND NOT OSArchitecture = "64-bit"

select * from Win32_OperatingSystem WHERE Version like "6.1%" AND ProductType="1" AND OSArchitecture = "64-bit"


Click on the AD FS Client Settings GPO, and from the WMI Filtering drop down, click on the new WMI filter you just created to ensure it is bound to the GPO.

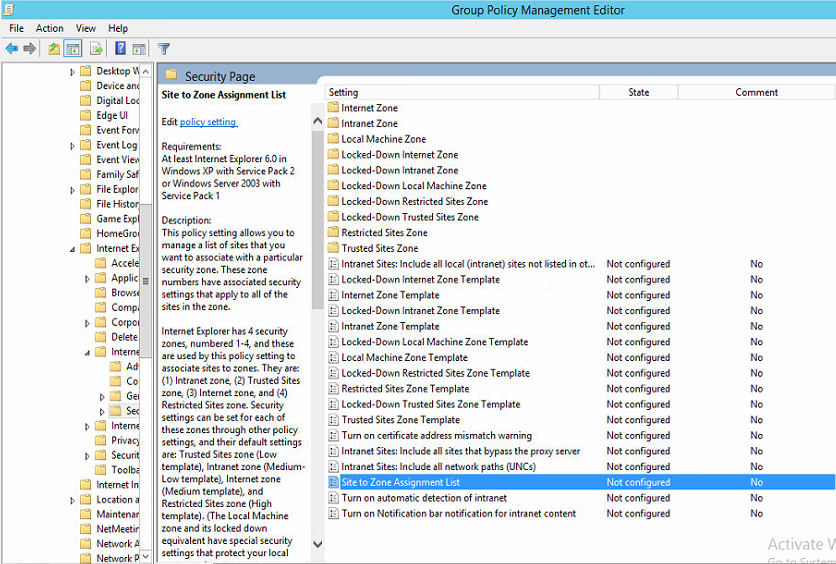
It is probably best to scope this setting to the Computer instead of the User account, edit the GPO and expand Computer Configuration/Policies/Administrative Templates/Windows Components/Internet Explorer/Intern Control Panel/Security Page and double click the Site to Zone Assignment List.

Click Enabled and then Show...

In the Value Name string enter the AD FS service URL, and the value of 1. The value basically corresponds to the zone that this policy applies to.
1 = Intranet/Local Zone
2 = Trusted Sites
3 = Internet/Public Zone
4 = Restricted Sites

Review the settings from the Settings tab, now scope the GPO to the correct Domain/OU.

Tuesday, 14 July 2015

Microsoft Surface Pro 3 Boot from USB Not Working

Easy blog post which may not help many IT Professional but if your a consumer this post hopefully helped you. 

I recently got a Microsoft Surface Pro 3 hybrid device for using at work, it's a nice device that is lightweight and powerful so perfect if you travel a lot like me.

As I passionately hate the OEM builds of Windows you get on next devices the first thing I wanted to do was to rebuild it myself with a clean Windows 8.1 Enterprise image.

Obviously the Surface 3 does not have an optical drive so the only options are to boot from USB, PXE or attach an external DVD drive. I do not have an MDT/PXE server setup and handy so USB was my only option.

The official manual says to boot a Surface Pro 3 you do;
  • Turn Off Device Completely
  • Press/Hold Volume Down Button
  • Turn Device On
  • Release Volume Button when Surface Splash Screen Appears
This for whatever reason did not work for me so I started looking around on forums, and someone had mentioned if you rename your USB drive with Windows on to "BOOTME" it forces the Surface to boot from it. Never worked for me.

The only way in which I could get a new operating system installed was to run the Windows 8.1 setup from the old installation.


If you do it this way (which from what I can remember never worked in older versions of Windows) the setup automatically reformats the SSD disk and reinstalls everything for you.

I found that after the first reboot the Surface hangs at the Surface splash screen, the fix is to hard reset it while leaving the USB drive inserted.