Showing posts with label Office 365. Show all posts

Thursday, 8 November 2018

Things to remember when configuring Exchange Hybrid to Office 365 and Exchange Online


Tip 1 – Office 365 should be used as a smart host for external mail routing

The Hybrid Configuration Wizard creates connectors on the Exchange Server to route mail to and from Office 365. By default, the on premise Send Connector is configured to only route mail destined for the “tenantname.mail.onmicrosoft.com SMTP namespace.

This Send Connector is configured to use MX records lookups to find its next hop to route mail to this SMTP domain. I have had far better results if the Send Connector is manually configured to send all mail for “tenantname.mail.onmicrosoft.comto the tenant’s public MX record target. In theory it should make no difference!

For clarity you modify the Send Connector on the Exchange Server it is usually labelled “Outbound to Office 365” if the HCW was used to configure your server. You can also find the MX record target by using MX Toolbox.


You will notice the smart host authentication option is set to None. Office 365 will use the federation certificate in place to authenticate the server, therefore no authentication is required on the Send Connector. 


Tip 2 – The Exchange Hybrid Configuration Wizard does not complete the job

If you have on premise Exchange Server before adopting Office 365, it is likely that you will have Send Connectors already in place to route mail to the Internet. During the design phases you must decide how you are going to architecture your mail flow. Personally I think it’s best to route all email from the Internet through Exchange Online, then down to the Exchange Server if the mail enabled recipient resides on premise. I also think routing outbound mail (for all domains) should be done through Exchange Online. This is something that the HCW does not do during the wizard led set up.

A new Send Connector is created labelled “Outbound to Office 365” which routes mail to the tenant SMTP domain for hybrid mail flow. My recommendation would be to edit this Send Connector and add the all domains asterisks. With this configuration all mail for all domains will be pushed to Exchange Online for routing. 


All of your design decisions should be led by requirements, however in a simple environment this will cover most basis. It does however, become complicated if you bring third party mail hygiene solutions into the mix.

Tip 3 – Active Directory attributes matter in hybrid for proper mail flow

Active Directory attributes are used to route mail in a hybrid environment. The attribute “targetAddress” is the most important for internal mail flow to work correctly. If you have mailboxes on premise and in Office 365 this is needed for your AD users who have a mailbox in Office 365.

On premise mailbox users do not have the “targetAddress” populated, however if you complete a mailbox migration to Office 365 and commit the changes, Exchange will populate this attribute in AD to ensure internal mail flow will work correctly.

One project I worked on had Office 365 before it had Active Directory. In this case you might have to do some work to manually populate the AD attributes for mail flow to work. In most scenarios AD and Exchange will be in place long before Office 365. Another important point to remember is that when you have on premise Exchange, this should be used to administer mailboxes (including creating new Office 365 mailboxes), this way all the attributes required will be populated for you.
I’ve written a dedicated blog post to cover AD attributes in Exchange Hybrid


Another useful post, how to add targetAddress and proxyAddress with Powershell to multiple objects, this could be useful if you have incorrectly created Office 365 mailboxes without using on premise Exchange in hybrid.


In addition to the above, if you incorrectly create an Office 365 mailbox you might need to run the command, before your cloud mailboxes work correctly. This command should be run from the Exchange Server.

Enable-RemoteMailbox “user” –RemoteRoutingAddress “email.address@tenant.onmicrosoft.com

This command will also ensure any cloud mailboxes which were created before the Exchange Server show up inside the on premise ECP under Recipients.

Tip 4 -  Autodiscover must point to the on premises Exchange in hybrid

Although there is conflicting documentation on this, the Exchange Deployment Assistant states that in hybrid environments the external autodiscover records must point towards the on premise Exchange Server. This will cause the Office 365 portal to show an error as it’s expecting all records to be pointing to it. After testing autodiscover will not work for on premise mailboxes if the external records point to Office 365. I generally create an internal CNAME record as well pointing to the internal Exchange Server.

Tip 5 – Network rules are important in hybrid

For hybrid to work SMTP is important. The Exchange Server must be able to communicate with Office 365 inbound and outbound on TCP 25. You can update your firewall rules to only allow the known Office 365 IP’s to be accepted for SMTP.


You can use the following command to test this from either side.
Test-NetConnection –ComputerName “fqdn” –Port 25

Thursday, 4 October 2018

Configure IP Whitelist for Network Devices to Send Mail to Exchange Server without SMTP Auth

This is very easy and is done using a new Recieve Connector. 

Login to the ECP and click Mail Flow, then Recieve Connectors. Create a new Recieve Connector.

Name the connector something descriptive. 

Select Frontend Transport and Custom.

In Network Adapter Bindings leave "All available IPv4" this is only the case if the Exchange Server has a single NIC. It's slightly different if your server has arms in two networks.

In Remote Network Settings, enter the IP's of the network appliances you want to be able to send mail without authentication.

Click Finish.

To test use the following Telnet commands (you run this from a server which is listed as allowed in the new Recieve Connector).


set localecho
OPEN mail.domain.com 25
EHLO domain.com
MAIL FROM:ise@domain.com
RCPT TO:ryan.betts@domain.com NOTIFY=success,failure
DATA
Subject: Test from Telnet

Testing
.
QUIT

If it's successful it should return a message similar to below.


If you want the server to be able to relay to external domains you must run another command as well.

Change it to reference your Exchange Server and Recieve Connector name, also remember and run it from Exchange Mgmt Shell or it will fail. 

Get-ReceiveConnector "EXSRV\REC CONN NAME" | Add-ADPermission -User 'NT AUTHORITY\Anonymous Logon' -ExtendedRights MS-Exch-SMTP-Accept-Any-Recipient

Wednesday, 3 October 2018

Show "Caution: This email originated from outside of the organization. Do not click links or open attachments unless you recognize the sender and know the content is safe." warning to users when mail originates from outside Exchange Organisation

To try and attempt to reduce phising attempts it is possible to attend a HTML warning to users when they receive emails from outside the organisation. This is overkill in many environments but some insist on it being in place. 

It's achieved using Transport Rules in Exchange Online, the code below implements a warning 

"Caution: This email originated from outside of the organization. Do not click links or open attachments unless you recognize the sender and know the content is safe."


//Create a Session to Exchange Online

Write-Host "Getting the Exchange Online cmdlets" -ForegroundColor Yellow
$Session = New-PSSession -ConnectionUri https://outlook.office365.com/powershell-liveid/ `
    -ConfigurationName Microsoft.Exchange -Credential $credentials `
    -Authentication Basic -AllowRedirection
Import-PSSession $Session -AllowClobber

//Create a new Transport Rule

New-TransportRule -Name "External Mail Warning - Outside Organisation" -Priority 0 -FromScope "NotInOrganization" -ApplyHtmlDisclaimerFallbackAction Ignore -ApplyHtmlDisclaimerLocation "Prepend" -ApplyHtmlDisclaimerText "<div style=""background-color:#FFEB9C; width:100%; border-style: solid; border-color:#9C6500; border-width:1pt; padding:2pt; font-size:10pt; line-height:12pt; font-family:'Calibri'; color:Black; text-align: left;""><span style=""color:#9C6500; font-weight:bold;"">CAUTION:</span> This email originated from outside of the organization.  Do not click links or open attachments unless you recognize the sender and know the content is safe.</div><br>"

Tuesday, 2 October 2018

Disable Outlook Focused Inbox across the entire Office 365 tenant

Use the following command to disable the annoying "Focused Inbox" setting across your entire tenant. It is possible to disable it on a per user basis, but do the right thing and remove it for everyone!

$UserCredential = Get-Credential

Install-Module MSOnline -Force
Import-Module MSOnline

$Session = New-PSSession -ConfigurationName Microsoft.Exchange -ConnectionUri https://outlook.office365.com/powershell-liveid/ -Credential $UserCredential -Authentication Basic -AllowRedirection

Import-PSSession $Session 

Set-OrganizationConfig -FocusedInboxOn $false

Get-OrganizationConfig //Check to see FocusedInbox is set to “false”

Update all user "targetAddress" and "proxyAddress" attributes in AD using Powershell for Exchange Hybrid

AD attributes are important when you have a hybrid setup from your on premise Exchange to Office 365, the following script will help retrospectively publish the required objects to your domain users so that hybrid mail flow works correctly.

Review this article for details on AD attributes in Exchange with hybrid connectivity.

http://blog.ryanbetts.co.uk/2018/09/understanding-ad-attributes-in-exchange.html

The following command can be used to export a list of users to a CSV file, you should change the OU path to suit your own environment. Once you have a list of users copy and paste them into a blank text document.

Get-ADUser -SearchBase "OU=Standard Users,OU=User Accounts,OU=Grand Cayman,OU=Company X,DC=domain,DC=com" -prop * -Filter * | Select samaccountname | Export-CSV C:\Users\Administrator\Desktop\Users.csv

The following command will set the "targetAddress" attribute for every user listed in the text file.

The "targetAddress" is used when on premise mailboxes try to send mail to Office 365 mailboxes.

Remember to capatilise SMTP as this will ensure it's the primary email adress. 

Get-Content C:\Users\da.ryan.betts\Desktop\O365Users.txt | % { Set-AdUser $_ -add @{targetAddress="SMTP:$_@companyx.mail.onmicrosoft.com"}}

The following command will append the FQDN, your public domain should be set as the primary so ensure caps are used with SMTP.

Get-Content C:\Users\Administrator\Desktop\O365Users.txt | % { Set-AdUser $_ -add @{proxyAddresses="SMTP:$_@companyx.com"}}

A second pass of the same command will add the additional proxy address which should be tenantname.mail.onmicrosoft.com


Get-Content C:\Users\Administrator\Desktop\O365Users.txt | % { Set-AdUser $_ -add @{proxyAddresses="smtp:$_@companyx.mail.onmicrosoft.com"}}


When you sync the AD to AAD using AD Connect the x500 entry will also appear under proxyAddresses. 

Thursday, 27 September 2018

Understanding AD Attributes in an Exchange Hybrid

Scenrio: You have Active Directory which stores users with AD Connect doing password sync, all mailboxes with the exception of a few are in Office 365. Hybrid mail flow is required between the on premise mailboxes and Office 365. All the AD users were created using AD Users and Computers and not the Exchange Server.
Problem: If you have on premise user accounts with Office 365 mailboxes. If the user accounts have been created using Active Directory Users and Computers and not Exchange they will not have all the required attributes to route mail internally.
It's worth having an Exchange Server purely to do email administration, unless you know what AD attributes to manipulate manually.
Office 365 mailboxes should be created using the on premise Exchange Server, this will create the new AD object with the correct attitrbutes set.

When a new mailbox in Office 365 is created with an on premise user account Exchange populates the "targetAddress" attribute which is used to route mail from on premise to Office 365. Please note this attribute is not synced to AAD using AD Connect.
It's added in the format SMTP:username@domain.mail.onmicrosoft.com

It also populates the "proxyAddresses" attribute with a primary email set to the custom domain and another set to @domain.mail.onmicrosoft.com 

If you force AD Connect to sync the user will appear as unlicensed in the portal. 

Assign a license to it then force another AD sync.

If you return to the "proxyAddresses" attribute you will see another x500 field has been create. All of these attributes are required to ensure mail can be routed between on premise and Office 365.

If you have created a batch of users in the traditional way, synced them to Office 365, assigned licenses then allowed users to use the mailboxes. You will not be able to send mail from on premise mailboxes to them, this is because the "targetAddress" attribute is not populated by ADUC.

Wednesday, 19 September 2018

Office 365 OME setup mail encryption with a transport rule in Exchange Online

Office 365 offers multiple options for providing an encrypted mail service to users. Office 365 Message Encryption (OME) offers the best flexibility as Office 365 automatically trusts many of the main stream mail system providers for message decryption. S/MIME still requires a complex certificate exchange to be done between sender and recipient to ensure messages can be decrypted.
Mail providers Outlook.com, Yahoo and Gmail are automatically trusted by Office 365 and can automatically decrypt messages.
Other mail services which cannot automatically decrypt OME messages present a different set of challenges. One Time Passwords (OTP) are issued by Microsoft when an encrypted message is received by a mail server that cannot automatically decrypt messages. The OTP is sent directly from Microsoft to a user’s inbox (using the email address which was set as the recipient of the encrypted message). This way Microsoft can authenticate that only the intended recipient has received the OTP to decrypt the secured message.
Office 365 OME is a feature which is available in the following SKU’s Office 365 E3/E5, Microsoft E3/E5, A1, A3, A5 and G3/5. No licenses are required on the receiving side to accept encrypted mail. In this example we are going to make use of the Microsoft managed keys, however understand that it’s possible to BYOK to Azure Information Protection.
Go to the Azure Portal when you are logged in with your Office 365 credentials. Find Azure Information Protection from the portal. 

Click on Protection Activation, if this is not active, go ahead and activate it. 

Open the Exchange Admin Center and go to Rules. We are going to create a new Transport Rule to apply the encryption policy to emails that contain certain words. Click the + icon and select Apply Office 365 Message Encryption and Rights Protection to Messages.

Label the Transport Rule something sensible and click the Apply this rule if...and select The subject or body...then subject includes any of these words


Enter all the key words in which you want to be used to encrypt mail. I think it's generally good to use "encrypted", if you do this ensure you put in all the obvious spelling mistakes for "encrypted" so that users don't send clear-text messages because of typo's.

It's very easy to send encrypted email from Outlook with a Transport Rule in place to apply the encryption rule. Simply ensure the work "encrypted" is in the subject line, this words that is looks for before encrypting the message are user-defined in the steps above. 

When a recipient is also on Office 365 the message is automatically decrypted. You will notice the red marker to outline that this message is encrypted. Please note that when a single message (or reply) is encrypted, the entire conversation/message chain is encrypted.
If an encrypted message is viewable to a recipient, it's automatically opened into OWA. For some reason the message does not open directly in Outlook. This does ensure that the encrypted message cannot be forwarded. 

What happens if your send an encrypted email to a mail service which cannot automatically decrypted the message?


The encrypted message is opened in the browser.


The OTP is sent to the inbox.


The recipient can respond to the message securely in the browser.

Wednesday, 18 July 2018

Enabling Mailbox Auditing in Office 365


Mailbox Auditing is not enabled by default in Office 365. Mailbox Auditing is a security flag when you check the Security Score of your tenant. The Security Centre states that Mailbox Auditing should be abled for at least 90% of the mailboxes in your organisation.

Mailbox Auditing allows administrators to search the audit log for mailbox activity.

Imports the Office 365 Module
Import-Module MSOnline

Stores the Global Admin Creds in a Variable
$UserCredential = Get-Credential

Connects to the Tenant using the Variable
Connect-MsolService = $UserCredential

Creates a Session to Exchange Online and Stores in Variable
$Session = New-PSSession –ConfigurationName Microsoft.Exchange –ConnectionUri https://outlook.office365.com/powershell-liveid/ -Credential $UserCredential –Authentication Basic -AllowRedirection

Import-PSSession $Session

Enables Mailbox Auditing for all Users
Get-Mailbox -ResultSize Unlimited -Filter {RecipientTypeDetails -eq "UserMailbox"} | Set-Mailbox -AuditEnabled $true

Verifies that Mailbox Auditing is Enabled, if so “True” will be returned
Get-Mailbox "Username"| FL Audit*

Tuesday, 19 June 2018

Enabling Azure AD Self Service Password Reset/Writeback, and what happens when users exist in Office 365 before Active Directory is synced using AD Connect


I had to test a few scenario's as I was taking over a project centred around Office 365, the only twist was that user accounts had been provisioned in Office 365 before the production Active Directory was in place (and AD Connect).
I had to test what would happen when the following
  • User A existed in Office 365 but was then created in AD (with the same email address) and synced.

The outcome of this test is that User A is still retained in Office 365 with all the existing permissions and testing however their original Office 365 password is overwritten with the new password which is set on their user account in Active Directory. In short the on premise Active Directory becomes the point of authority for passwords which in turn overwrite any existing passwords in Office 365.
The next part I had to test was Azure AD Password Write back, this feature is useful for me on this project as users who were already using Office 365 would have to be provisioned with AD accounts. The plan was to create new user accounts (matches Office 365 email) for everyone with a generic password, when AD Connect was in place, they would then be asked to login to Office 365 using their new generic password. When they had authenticated to Office 365 they would be instructed to reset the generic password to be their own password. After the new password was accepted by Azure AD, it would in turn then we written back to AD, thus becoming the primary and only password for AD and Azure AD.
It should be noted that Azure AD Premium is need to support Azure AD Password Write back.
If you are doing this for the first time it's not obvious that you have to change the Default Domain Policy on the Active Directory to set the Minimum Password Age to 0, or you will get the following error.


The Default Domain Policy usually holds the global account policies for the Active Directory.
You must enable Self Service Password Reset from the Azure AD portal. 
You must also ensure password write-back is enabled from the same portal. 

The workflow for when users login after write-back has been enabled.
a.) User is issued new password (for Active Directory)
b.) Administrator forces AD Connect do a sync to Azure AD
c.) User is asked to login to Office 365
d.) User is asked to register self-service password reset questions
e.) User is logged in with Active Directory password
f.) User attempt's to reset Active Directory password from Office 365 portal
g.) Office 365 accepts the users new password and writes it back to Active Directory
h.) This password becomes the only password for Active Directory and Azure AD
i.) Event 31007 is logged in the Azure AD Connect server to confirm the write back operation.
In this example my domain was running on Windows Server 2008 R2, no permission changes had to be made to get password write-back working. I did however do exactly the same thing on a production environment all running Windows Server 2016 Domain Controllers, and it never worked, you can find the solution here.

Force removal of synced Azure AD accounts when synced domain is no longer available

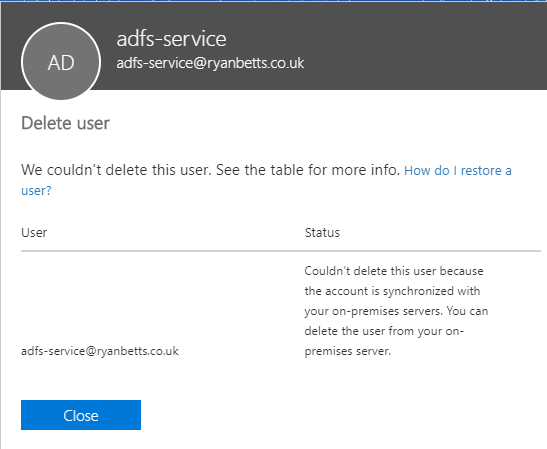
If you have Azure AD Connect syncing users from on premise Active Directory you will be unable to delete user accounts from the Office portal. This is the expected behaviour as the point of authority is Active Directory, when AD Connect is in place. 

You will be faced with the following error if you try "Couldn't delete this user because the account is synchronised with your on-premises servers. You can delete the user from your on-premises server." this is fine to resolve if your domain is up and operational, you simply delete the account from AD and force a sync with AD Connect. 


In this scenario this was my lab and the Active Directory that was destroyed ages ago when an SSD failed in my lab server. 

It is possible to break the relationship to Active Directory if AD Connect is offline and the domain is unrecoverable. It starts by connecting to Office 365 using Powershell.

You can download the Azure AD Powershell module using the following command

 Install-Module -Name AzureRM -AllowClobber 

You can then connect to Office 365 using the following command

 Connect-MsolService  

When you are connected to your tenant issue the following command to disable directory sync

Set-MsolDirSyncEnabled -EnableDirSync $false 

Once this command has run, it takes a while to propagate through Azure AD.

Once it was done you should be able to manually delete objects from the Office portal.

You need to enable directory sync again if you plan to provision a new domain and install AD Connect.

Set-MsolDirSyncEnabled -EnableDirSync $true 

I managed to delete all the orphaned user accounts with the exception of one, the AD sync account. It failed with "We couldn't delete this account: Sync_rbVM. This is your directory synchronisation account and you'll have synchronisation failures if it's deleted."

After leaving the portal for a bit and trying again I managed to remove this account.