Showing posts with label DAG. Show all posts

Saturday, 16 August 2014

Exchange 2013 SP1: Failed to mount database "db name". Error: An Active Manager operation failed. Error: The database action failed. Error: Operation failed with Message: MapiExceptionDatabaseError

I have recently been working on an Exchange 2013 migration, so we are at the stage of migrating the mailboxes. I run a script to migrate all of the mailboxes contained in a text file. 


Get-Content C:\ListofUsers.txt | New-MoveRequest –TargetDatabase “db name” Confirm:$false

I was then using the Get-MoveRequest to check on the progress.


Get-Content C:\ListofUsers.txt | Get-MoveRequest

As the migration had been running over night I checked up on it and it had appeared to halt as not much had changed since I looked at it the night before. I opened up the ECP and headed over to Server\Databases and all of the databases were in the dismounted stage. The lesson here was that I forgot to enable Circular Logging on the databases, my colleague Terence Luk 
http://terenceluk.blogspot.com contributed with the wisdom on enabling Circular Logging on the database instances!

When I tried to use the ECP to mount the databases I got the following error;

Failed to mount database "db name". Error: An Active Manager operation failed. Error: The database action failed. Error: Operation failed with Message: MapiExceptionDatabaseError: Unable to mount database.


I then used the following command to test the status of the DAG replication;


Test-ReplicationHealth | fl check,error


The error was Error: There is not enough space on the disk. I then opened up Explorer on one of the Mailbox servers and the entire Transaction Log partition had been consumed within 3 days. It was set to 20 GB's. As the entire Exchange infrastructure was virtual running on VMware vSphere 5.1 I simply extended the VMDK used by Windows to store the Transaction Logs. I also rebooted both of the MBX server, to refresh and effectively reset all of the Exchange services.


I then tried to mount the databases again from the ECP, and they mounted successfully this time. You could off course do this using the Mount-Database command from the Exchange Management Shell also.


Friday, 15 August 2014

Exchange 2007 to 2013 Migration: Get-Content C:\userlist | New-MoveRequest -TargetDatabase "The operation couldn't be performed because object ' user' couldn't be found on 'dc.domain.local"

This post is not particularly a complex or interesting fix, I am posting it here for my own reference should I ever need to do something similar again. Who knows hopefully you find it useful too!
I was recently working on an Exchange 2007 to 2013 migration for a client and part of the project was to implement Database Availability Groups (DAG's) and segment mailboxes into Mailbox Databases by each department in the business. To do this I requested a list of users in each department from the client. The list had been generated by Active Directory and unfortunately all of the user names had a two space characters at the beginning of the string.

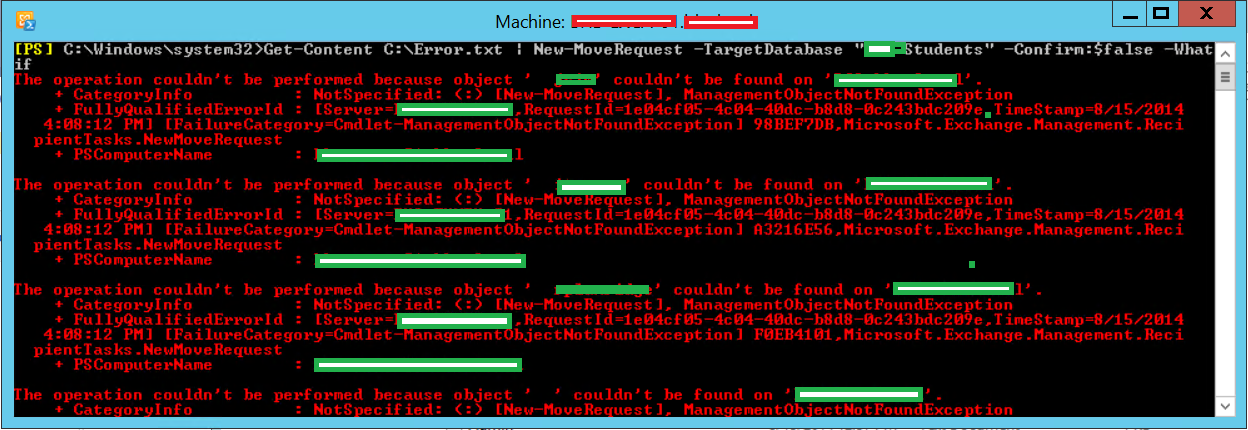
When I use the following command with the -Whatif switch to test my syntax and text file I receive an error.
Get-Content C:\Error.txt | New-MoveRequest –TargetDatabase “Mailbox Database” –Confirm:$false -Whatif

The operation couldn't be performed because object '  user' couldn't be found on 'dc.domain.local' this was because of the two space characters before each of the usernames in the C:\Error.txt file. 

I copied the lists of users over into an Excel spreadsheet, and used the following formula to remove the first two characters from the user name strings;
=RIGHT(A1, LEN (A1)-2)


This was in the column on the right of the user names, you can then drag the box down to populate all of the cells and the magic of Excel changes A1 to A2, A3,A4 etc. I then simply copy and pasted this back into a text file.


Now if I run the command again, the Exchange Shell does What if: Creating move request for each of the user accounts. If I were to remove the -Whatif­ switch, the Exchange Shell would begin migrating all of the users in the text file over to the new database.
Get-Content C:\Error.txt | New-MoveRequest –TargetDatabase “Mailbox Database” –Confirm:$false -Whatif

Thursday, 19 June 2014

Configuring Database Availability Group (DAG) in Exchange 2013 SP1

In this example I have two Mailbox Servers, and two Client Access Servers. I am going to configure a Database Availability Group. The official Microsoft description of a DAG, borrowed from TechNet.


DAG's work by replicating Mailbox Databases to neighbouring Mailbox Servers, deployed correctly this can create a highly resilient Exchange environment. Although Replication traffic can share the traditional MAPI network, it is considered best practise to separate the Replication traffic do it own network, either a subnet and/or VLAN.
 
I have provisioned my Mailbox Severs with two network adapters to support this configuration. It is important to name the adapters descriptively, as by default Exchange 2013 automatically configures the separate Replication network.
 
My adapters have been renamed Domain and Replication. The Domain interface is on the 192.168.1.0/24 subnet which is my production subnet that contains Domain Controllers, SCCM etc. The Replication interface is configured on the 196.100.10.0/24 subnet.
 
 
The Domain interface should be configured like it would on any other server, although as a Windows computer can only have a single default route (Default Gateway) the Replication interface should not be configured with a Gateway.
 
 
Click on the Advanced... button from the Internet Protocol Version 4 (TCP/IPv4) Properties page, and select the DNS tab. Untick the Register this connection's addresses in DNS.
 
 
As the Replication interface does not have a default gateway, a static route is required to provide a route to the rest of the subnet. The route add subnet mask subnetmask interface -p command to add this route. The -p switch ensures the route is persistent.
 
 
You can perform a route print to display the routing table on the server.
 
 
You will run into issues when creating the DAG, and adding DAG members if the bind order is not configured correctly. It is important the Domain interface is the primary connection.
 
 
The DAG itself must be represented in Active Directory, by the way of a Cluster Name Object. This is done by creating a disabled computer object. To do this open Active Directory Users and Computers, right click and select New, Computer name this object according. Please note when creating the DAG it must be named the same as the object.
 
 
As mentioned previously it's important the DAG computer object is disabled.
 
 
The security principal Exchange Trusted Subsystem is added to the ACL of the Cluster Name Object. It must also have Full Control access to this object. You can do this by using the Security tab on the properties of the object.
 
 
Now open the Exchange ECP and click Servers, Database Availability Groups. Click the + symbol to create a new DAG.
 
 
Now populate the fields with the corresponding information. Notice my mistake here, that will cause this to fail. My DAG is not named exactly the same as the Cluster Name Object, please ensure this is done properly. The File Share Witness is used as a tie breaker if servers suffer failure, if you do not specify a Witness server the wizard will automatically create it on one of the Client Access Servers. If you choose to configure your own File Share Witness, the Exchange Trusted Subsystem security principal must be in the local Administrators group of the server that is going to host the File Share. You will notice a Domain Controller cannot be a File Share Witness because DC's do not have local users and groups.
 
A DAG must also have an IP address, it is my recommendation to make this a static address even though the option is there to have DHCP assign an address dynamically.
 
 
Click Save and the DAG is created.
 
 
Now you must add DAG members to the DAG, this is done using the Add DAG Member button.
 
 
Click the + to add servers.
 
Select the Mailbox Servers you want to be part of the DAG, click Add and OK.
 
 
Click Save to commit the configuration.


By default Exchange automatically detects and configures the MAPI and Replication networks, there is not an obvious place in the GUI to show the MAP and Replication networks configuration. The PowerShell command Get-DatabaseAvailabilityGroupNetworks this shows how Exchange has configured the networking.
 
 
Now the DAG is created, with DAG members you must now configure Database Copies on the individual Mailbox Databases you want to be replicated by the DAG.
 
Click the ... icon and select Add Database Copy.


Specify the Mailbox Server you would like the Database replicated to. The Preference number is used to define a preference of where the database should be mounted while the DAG is operating normally. Click Save.
 
 
The wizard will now replicate the initial copy to the new DAG member server.
 
 
The Active button can be used when a server is selected to gracefully manage the failing over of what server is currently hosting the Mailbox Database. The Activate button will mount the Database on another DAG member and automatically redirect all connection, and it will also manage the reverse of the replication traffic. This can be useful if a server hosting a Mailbox Database requires updating or patching.


Exchange 2013: Adding Mailbox Servers to existing DAG - Error "A server-side database availability group administrative operation failed with a transient error. Please try the operation again"

When you are in the process of creating a DAG, the process halts and returns the error "A server-side database availability group administrative operation failed with a transient error. Please try the operation again"
 
 
The clue is in the last part of the error "The fully qualified domain name for node "DAG" could not be found" this error is caused because the Cluster Name Object has not been pre created in Active Directory or alternatively the name of the Cluster Name Object computer account does not match the name of the DAG you are trying to add these computers to.