Solarwinds offer a completely free tool to create batches of AD user accounts.
https://www.solarwinds.com/free-tools/active-directory-admin-tools-bundle
It works using CSV files to import users and match attributes. The following spreadsheet is a template for this which has been used by Solarwinds.
https://www.dropbox.com/s/o2zlgtjwlw4ws08/Blank-CSV.csv?dl=0
Wednesday, 1 August 2018
Hybrid AAD Join for Microsoft 365 Windows 10 Enterprise Activation
Windows 10 Enterprise is bundled as part of Microsoft 365
E3, which is a subscription based service.
The scenario that required Hybrid Domain Join to be
configured was, that end user devices were coming shipped with Windows 10
Professional OEM. The customer requirements stated that Windows 10 Enterprise
was required, which was included in their Microsoft 365 E3 licenses.
Although
Microsoft would like to have every customer device managed completely by Azure
AD, it is unlikely many organisations will be retiring Active Directory anytime
soon.
The point to remember here is, that if you have devices that
are AD domain-joined you will not be able to activate a subscription based
Windows 10 license, unless Hybrid Domain Join is in place. Devices should be joined to the AD domain and in
an OU which is synced by AD Connect to Azure AD.
If you join your devices directly to Azure AD,
when you try to join the on premise domain you will get an error. Devices
should be connected to AD DS, synced to Azure AD and a GPO put in place to
ensure these devices register with AAD.
· It appears from Windows 10 1803 that devices
that are being upgraded via a subscription version of Windows 10 do not need to
be activated beforehand. Previously, if you were upgrading OEM Windows 10 Pro
clients to a subscription of Windows 10 Enterprise, all of these clients had to
be activated before the subscription would work.
AD Connect facilitates the configuration of Azure AD Hybrid
Join, however in my experience it does not configure it properly. It is
possible to do many of these tasks manually, as outlined in this guide


This is the part which AD Connect does not complete
correctly (I think). Under SCP Configuration you will notice that the wizard
has only detected the onmicrosoft.com domain under Authentication Source.
Initially
I could not get this to work, if you create the SCP and direct it to your
tenant.onmicrosoft.com devices will not show up as Hybrid Domain Join, so I
downloaded the ConfigureSCP.ps1 script as it prompts for the custom domain you
have associated with you Azure AD.

When you download the script, ensure your execution policy
is set to unrestricted so that the policy can run. The script will ask you to
specify the domain you want to create the SCP point for, at this stage I
entered my unique domain.

If the script completes successfully you should get a “Configuration
Complete!” message. You can further verify the SCP has been created using ADSI
Edit. If you connect to the Configuration partition and go to Services >
Device Registration Configuration.

The SCP which is created with the script is always created
with the same identifier which ends in 30080. If this is present in ADSI Edit
you know the ConfigurationSCP.ps1 script has completed properly.

The next part which is not blatantly obvious, or well
documented is that, if you use the ConfigurationSCP.ps1 script you must still
complete the AD Connect wizard. To do this ensure that the SCP Configuration
page looks like this, and nothing is selected.

In my environment only Windows 10 devices are required, so I
never selected support for “down-level devices”.

A GPO is also required to ensure synced computer objects are
registered in AAD, this is done using a Computer Configuration >
Administrative Templates > Windows Components > Device Registration the
setting Register Domain Joined Computers as Devices should be set to Enabled.
AD Connect Device Writeback should also be enabled which is
done in a very similar way to Hybrid Azure Join.
The command “dsregcmd
/status” can be used from a client to check the status, AzureADJoined
should be set to YES if everything has worked.

Devices will also appear in the AAD portal under Devices as “Hybrid
Azure AD joined”, when I first did this I never synced the Computer OU to Azure
AD which prevented it from working.

Under Activation you should also see confirmation that
Windows 10 Enterprise has activated. I think the “call home” feature is 30
days, meaning that devices with subscription Windows 10 must contact AAD every
30 days to remain in the activated state.


Thursday, 19 July 2018
Certificate Services New Cert Req from CSR fails with "The request contains no certificate template information 0x80094801 CERTSRV_E_NO_CERT_TYPE Denied by Policy Module 0x80094801 The request does not contain a certificate template extension or the Certificate Template request attribute."
When you try to request a new certificate from AD
CS using a CRS you get the following error
"The request contains no certificate
template information 0x80094801 CERTSRV_E_NO_CERT_TYPE Denied by Policy Module
0x80094801 The request does not contain a certificate template extension or the
Certificate Template request attribute."
This was when the "Request new CA
certificate" option was used from the Certificate Authority GUI.

To use the command line tools to generate this
certificate you must find the true certificate template name, please note that
this is not the template name which is displayed in the Certificate Templates
pane.
To find the true name right click Certificate Templates
and select Manage, find your template from the list and select Properties.

The certreq looking for the Template Name, not
the Template Display Name.tool is

Use the command line tool certreq.exe with the
following command
certreq –adminforcemachine –config “cahostname\certauthname”
-submit -attrib "CertificateTemplate: CertificateTemplateName" “C:\Path
to CSR”
Please note if you leave –adminforcemachine or –config
out of this command you will get the following error “The DNS name is unavailable and cannot be added to the Subject
Alternate Name”
Once you do this it will ask you to confirm which
AD CS in the AD you want to issue the certificate, in my example there is only
one.

Wednesday, 18 July 2018
Enabling Mailbox Auditing in Office 365
Mailbox Auditing is not enabled by default in Office 365.
Mailbox Auditing is a security flag when you check the Security Score of your
tenant. The Security Centre states that Mailbox Auditing should be abled for at
least 90% of the mailboxes in your organisation.
Mailbox Auditing allows administrators to search the audit
log for mailbox activity.
|
Imports the Office 365
Module
Import-Module MSOnline
Stores the Global
Admin Creds in a Variable
$UserCredential = Get-Credential
Connects to the Tenant
using the Variable
Connect-MsolService = $UserCredential
Creates a Session to
Exchange Online and Stores in Variable
$Session = New-PSSession –ConfigurationName Microsoft.Exchange
–ConnectionUri https://outlook.office365.com/powershell-liveid/
-Credential $UserCredential
–Authentication Basic
-AllowRedirection
Import-PSSession $Session
Enables Mailbox
Auditing for all Users
Get-Mailbox -ResultSize Unlimited
-Filter {RecipientTypeDetails
-eq "UserMailbox"}
| Set-Mailbox
-AuditEnabled $true
Verifies that Mailbox
Auditing is Enabled, if so “True” will be returned
Get-Mailbox "Username"|
FL Audit*
|
Install Azure AD & Office 365 Powershell Modules
How to install the latest Azure AD and Office 365 Powershell modules, please note that the Office 365 Sign In Assistant is also required on the workstation.
|
Set-ExecutionPolicy Unrestricted
Install-Module AzureAD
Install-Module MSOnline
Import-Module AzureAD
Import-Module MSOnline
Connect-MsolService
|
Tuesday, 19 June 2018
Enabling Azure AD Self Service Password Reset/Writeback, and what happens when users exist in Office 365 before Active Directory is synced using AD Connect
I had to test a few scenario's as I was taking
over a project centred around Office 365, the only twist was that user accounts
had been provisioned in Office 365 before the production Active Directory was
in place (and AD Connect).
I had to test what would happen when the
following
- User A existed in Office 365 but was then created in AD (with the same email address) and synced.
The outcome of this test is that User A is still
retained in Office 365 with all the existing permissions and testing however
their original Office 365 password is overwritten with the new password which
is set on their user account in Active Directory. In short the on premise
Active Directory becomes the point of authority for passwords which in turn
overwrite any existing passwords in Office 365.
The next part I had to test was Azure AD Password
Write back, this feature is useful for me on this project as users who were
already using Office 365 would have to be provisioned with AD accounts. The
plan was to create new user accounts (matches Office 365 email) for everyone
with a generic password, when AD Connect was in place, they would then be asked
to login to Office 365 using their new generic password. When they had
authenticated to Office 365 they would be instructed to reset the generic
password to be their own password. After the new password was accepted by Azure
AD, it would in turn then we written back to AD, thus becoming the primary and
only password for AD and Azure AD.
It should be noted that Azure AD Premium is need
to support Azure AD Password Write back.
If you are doing this for the first time it's not
obvious that you have to change the Default Domain Policy on the Active
Directory to set the Minimum Password Age to 0, or you will get the following
error.

The Default Domain Policy usually holds the
global account policies for the Active Directory.

You must enable Self Service Password Reset from
the Azure AD portal.

You must also ensure password write-back is
enabled from the same portal.

The workflow for when users login after
write-back has been enabled.
a.) User is issued new password (for Active
Directory)
b.) Administrator forces AD Connect do a sync to
Azure AD
c.) User is asked to login to Office 365
d.) User is asked to register self-service
password reset questions
e.) User is logged in with Active Directory
password
f.) User attempt's to reset Active Directory
password from Office 365 portal
g.) Office 365 accepts the users new password and
writes it back to Active Directory
h.) This password becomes the only password for
Active Directory and Azure AD
i.) Event 31007 is logged in the Azure AD Connect
server to confirm the write back operation.
In this example my domain was running on Windows
Server 2008 R2, no permission changes had to be made to get password write-back
working. I did however do exactly the same thing on a production environment
all running Windows Server 2016 Domain Controllers, and it never worked, you
can find the solution here.
Force removal of synced Azure AD accounts when synced domain is no longer available
If you have Azure AD Connect syncing users from on premise Active Directory you will be unable to delete user accounts from the Office portal. This is the expected behaviour as the point of authority is Active Directory, when AD Connect is in place.
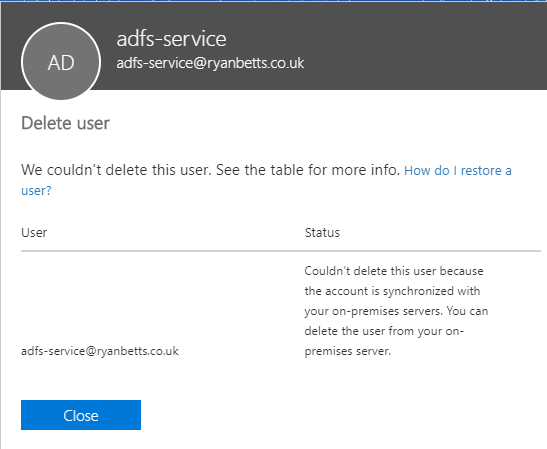
You will be faced with the following error if you try "Couldn't delete this user because the account is synchronised with your on-premises servers. You can delete the user from your on-premises server." this is fine to resolve if your domain is up and operational, you simply delete the account from AD and force a sync with AD Connect.
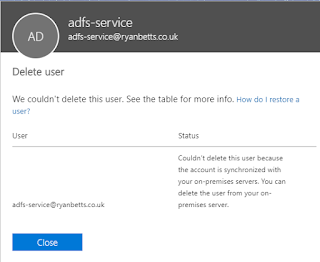
You will be faced with the following error if you try "Couldn't delete this user because the account is synchronised with your on-premises servers. You can delete the user from your on-premises server." this is fine to resolve if your domain is up and operational, you simply delete the account from AD and force a sync with AD Connect.
In this scenario this was my lab and the Active Directory that was destroyed ages ago when an SSD failed in my lab server.
It is possible to break the relationship to Active Directory if AD Connect is offline and the domain is unrecoverable. It starts by connecting to Office 365 using Powershell.
You can download the Azure AD Powershell module using the following command
Install-Module -Name AzureRM -AllowClobber
You can then connect to Office 365 using the following command
Connect-MsolService
When you are connected to your tenant issue the following command to disable directory sync
Set-MsolDirSyncEnabled -EnableDirSync $false
Once this command has run, it takes a while to propagate through Azure AD.
Once it was done you should be able to manually delete objects from the Office portal.
You need to enable directory sync again if you plan to provision a new domain and install AD Connect.
Set-MsolDirSyncEnabled -EnableDirSync $true
I managed to delete all the orphaned user accounts with the exception of one, the AD sync account. It failed with "We couldn't delete this account: Sync_rbVM. This is your directory synchronisation account and you'll have synchronisation failures if it's deleted."
After leaving the portal for a bit and trying again I managed to remove this account.
Wednesday, 4 April 2018
Backup SQL Server 2016 Databases using Powershell
It is possible with SQL Server 2016 (possibly earlier as well) to use Powershell to backup your databases. If I ever need to do this I use the SQL Management console, however I'm using a Mac through RDP which means right click is not working :)
It's very easy to take the backup, set the variables, of server name, db name and output path.
It's very easy to take the backup, set the variables, of server name, db name and output path.
|
$server = “TWSQL1”
$database = “ConfigMgr”
$output = “C:\Users\Administrator\Desktop\SQL\ConfigMgr.bat”
Backup-SqlDatabase -ServerInstance $server -Database
$database -BackupFile $output
|
Tuesday, 23 January 2018
Lessons learned from migrating legacy Windows Server 2003 VM's to Azure
Although Windows Server 2003 is long since been supported officially by Microsoft, and everyone should really be off the platform, there are some legacy applications still used in production that rely on these legacy operating systems.
To my knowledge, Microsoft has never supported Server 2003 on Azure, since its inception, and they pulled support for Server 2008 a good few years ago. It is, however, possible to run “unsupported” versions of Windows inside Azure IaaS VM’s, provided you don’t whine to Microsoft if they don’t work correctly. As Azure runs a flavour of Hyper-V, generally any specialised VHD you upload will run. You can prove this by using boot diagnostic screenshots, however the most frustrating thing to follow this is being unable to access the VM once you know it has booted.
This can even be the case if you follow the official guidance on preparing VHD’s for Azure
The above article walks you through ensuring the VM is configured correctly to support incoming RDP connections etc. It is however all done in PowerShell, most of the commands don’t run successfully on Server 2003 so you have to decipher and perform most of the changes manually using either the registry or CMD.
If you are going to run Server 2003 on Azure, you must ensure the Hyper-V Integration Services are installed inside the VM. One of the annoying things, if you are coming from VMware, is that the Integration Tools will fail to install if the setup does not detect Hyper-V. When I’m moving VMware VM’s I usually have a Hyper-V host available to do some testing, you can now run nested Hyper-V 2016 on Azure if you use certain instance types.
Full details on nested Hyper-V on Azure
It’s very simple to get nested Hyper-V going, you simply deploy a Server 2016 instance using one of the instance types that support nested virtualization. You then just install Hyper-V normally, after a few reboots you will have a nested Hyper-V server.
As tools such as ASR are out of the question if you are dealing with unsupported operating systems, I use the following method;
- · Ensure you have the local admin password available.
- · Prepare VM using checklist provided by MS.
- · Install the Azure VM Agent/Hyper-V Integration Services (2008 R2 onwards)
- · Use Disk2Vhd to convert the VM to VHDs (not VHDX).
- · Use Hyper-V to convert the dynamic VHD’s to fixed size VHD’s
- · Move the VHD’s to Azure Storage using Storage Explorer
- · Use nested Hyper-V to test the converted VM’s boot to Windows
o Even if you are coming from on premise you can use nested Hyper-V in Azure, I usually make use of the high bandwidth available in Azure. If you have uploaded VHD’s to Azure Storage it is possible to download the VHD’s into your nested Hyper-V instance (at 100mbp/s ~), the upload speed is quick as well.
o Only the newest versions of VMware support nested Hyper-V so it might be a good method if you cannot get a HV host up and going. The Azure route also helps if you do not have enough capacity to deploy a nested Hyper-V server.
o When you run a VM inside the nested Hyper-V you will then have the ability to run the Hyper-V Integration Services, in my experience, these are required as a minimum for a VM to be reachable inside Azure (NIC drivers required). Even if your VM does not support the Azure VM Agent, you can get a VM connected if the Hyper-V integration services are installed.
o Server 2016 does not provide the Integration Services ISO in the usual place C:\Windows\System32\vmguest.iso. However, you can get the ISO from Server 2012 R2.
· Use predefined ARM templates to deploy a specialised VM from a VHD.
o https://github.com/Azure/azure-quickstart-templates/tree/master/201-vm-specialized-vhd-existing-vnet
Subscribe to:
Posts (Atom)