Pages

Wednesday, 14 December 2016

Azure Backup Server (DPM) fails with "There is insufficient free space in the storage pool for this protection group. To increase the free space, cancel this wizard and add disks to the storage pool or remove non-DPM volumes from the disks in the storage pool. To assign custom volumes to selected members, click Modify."

When you try to create a new Protection Group you are faced with the following problem "There is insufficient free space in the storage pool for this protection group. To increase the free space, cancel this wizard and add disks to the storage pool or remove non-DPM volumes from the disks in the storage pool. To assign custom volumes to selected members, click Modify."

This was because the Storage Pool disk that had been configured had a partition on it. The disk must be in the raw format in order to create a new Protection Group. 

After deleting the partition from inside Disk Management, the Protection Group wizard allowed me to continue. 


Monday, 12 December 2016

Configuring Azure Site to Site VPN with Checkpoint 600 SMB Firewall

This post is going to cover setting up the Checkpoint 600 appliance for a dedicated Site to Site VPN to Azure. I will not cover the setup of setting up Azure vNets etc as this information is already here (although based on the Service Manager portal it’s still valid);


Azure Gateways can be provisioned as PolicyBased (static) or RouteBased (dynamic) routing but your firewall on the other end must be able to support either dynamic or static. Cisco ASA’s for example do not support Dynamic Routing, although the Checkpoint 600 does. Why does it matter? Well, if you want to establish a multi-site VPN you must use Dynamic Routing on the Azure Gateway. Therefore, the Checkpoint 600 is a great SMB firewall which offers better support for Azure VPN’s than Cisco ASA’s.

A full list of supported devices for VPN connectivity to Azure;


I should mention that although you are limited to what the Azure Gateway supports, you could provision a 3rd party virtual device instead of the native one provided by Azure. Checkpoint, Palo Alto etc offer virtual appliances in the Azure Marketplace.

Logon to the Checkpoint via the admin web interface and click the VPN tab.


Under Site to Site click on VPN Sites.


Click the New button to begin creating a new VPN connection. 


From the Remote Site tab give the site a label, and then enter the public address the Azure Gateway was provisioned with. 


The Azure Gateway uses pre-shared key authentication, this must be the same on both sides and please ensure you use a strong password. 


The pre-shared key is set under the Connection object in Azure. 


There are complex password generating tools which can be used to create a strong password.


Move down to the Remote Site Encryption Domain section, this is where you define the network and subnet mask your Azure network is using. Without this the Checkpoint would not be able to route traffic to Azure. 


You create a new network object for the Azure subnet. You do not have to put in the gateway subnet that is created when you provision an Azure Gateway.


Click the Encryption tab, and select Custom and set the following configuration according to the Checkpoint documentation.


IKE (Phase 1)
  • ·        Encryption = 3DES, AES-256
  • ·        Authentication = SHA1
  • ·        Diffie Hellman Group = Group 2 (1024 bit)
  • ·        Time out = 10800 seconds

IPsec (Phase 2)
  • ·        Encryption = AES-256, AES-128
  • ·        Authentication = SHA1
  • ·        [x] disable = Enable perfect forward secrecy
  • ·        Renegiotate = 3600 seconds


Click on the Advanced tab and ensure the Remote Gateway is a Check Point Security Gateway is disabled, and that Disable NAT for this site is enabled.


Expand Encryption Method I set this to Prefer IKEv2, support IKEv1 despite the Checkpoint documentation stating it should be set to normal IKEv2. The tunnel would be establish when it was set to IKEv2 in my environment. 


Browse to Access Policy and Policy, the VPN wizard should have automatically created the ACL rules to allow this VPN to work. This will be under the Incoming Rules section. 


Although the Checkpoint/Azure documentation states that the Checkpoint OS supports both Dynamic and Static routing types I could not get the VPN to establish when the Azure Gateway was set to static routing.

Another strange thing to keep in mind, when you first establish the VPN the status of the Azure Gateway might randomly change from Succeeded and Connected. I never worked out why this is, however after a couple of hours it seemed to stabilize. I read somewhere that a dynamic gateway only “connects” when nodes on either end are trying to send or receive. 

Thursday, 8 December 2016

Office 365 Remote Mailbox Moves Fails with "MigrationTransientException: The call to EWS failed because no service was listening on the specified endpoint. There was no endpoint listening at EWS/mrsproxy.scv that could accept. The remote server returned an error (404) not found."

This issue is caused by an ExchangeGUID mismatch between your on prem and Azure AD user objects. It is easily resolved using PowerShell. In my example it was because the ExchangeGUID in the cloud was not the same as the one for the on prem mailbox. I knew the hybrid and EWS was functioning correctly as it was allowing me to migrate certain mailboxes, it was only some users that would fail with this error.

Open the Exchange Management Shell from the on prem server and run the following command to find out what the on prem Exchange GUID is.
Get-Mailbox <MailboxName> | Format-List ExchangeGUID

Now run the following command from an Exchange Online session. To do this follow instructions in the following post http://blog.ryanbetts.co.uk/2016/08/creating-sessions-to-exchange-online.html
Get-MailUser -Identity <UserName> | fl displayname,ExchangeGuid
As you can see in my example the Exchange GUID's are in fact different. 

From the Exchange Online session use the following command to manually set the GUID to match the on prem one.
Set-MailUser -Identity user@domain.com -ExchangeGUID 9f2xxxa3b-xxxxxxxxx57d4dxxx3a1
Once this command completes you can use the Get-MailUser command again to check the changes have been written to Azure AD.

Wednesday, 7 December 2016

Office 365 Hybrid with Exchange 2013 – Migration Batch Remove Failed User

When you run a migration batch job with multiple user accounts it completes for some users and fails for others. The migration batch job has successfully migrated 3/5 of the user mailbox to Office 365, but I still have to get the other mailboxes up to Office 365. When I tried re-running the same migration job the same mailboxes failed again. I then tried to create a new migration batch job for each of the failed mailboxes, however that failed as you cannot have the same mailbox referenced in the same batch job at the same time.

From what I could tell there is no way from inside the GUI to remove migration users from a batch job, and if you are like me and have successful syncs within the same job you probably don’t want to delete the job, and if you are not at the point in which you want to “finalise” the migration job you must somehow remove the failed users from this batch job.


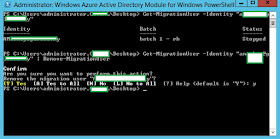
This can only be done using the Exchange Online PowerShell cmdlets. Firstly, create a session to Office 365 and then Exchange Online. From there you can run the following command to view and remove migration users.

Get-MigrationUser –Identity user@domain.com | Remove-MigrationUser


When you return to the GUI the users will have been removed from the migration batch and you will be free to create new migration batches to get the mailboxes ingested into Office 365.

It should be noted that you cannot actually complete (or finalise) a migration batch job if there are failed mailboxes referenced in the job. The option does not appear inside the GUI until all mailboxes in that job are “synced” successfully. 

Office 365 Patch Migration Fails with "Error: MigrationPermanentException: The target mailbox doesn't have an SMTP proxy matching "mail.onmicrosoft.com". The target mailbox doesn't have an SMTP proxy matching".

When you try to run a migration batch job it fails with "Error: MigrationPermanentException: The target mailbox doesn't have an SMTP proxy matching "mail.onmicrosoft.com". The target mailbox doesn't have an SMTP proxy matching" this is because DirSync has not added the target Office 365 SMTP domain as a proxy address.

If you open the problematic user with Advanced Features click on Attribute Editor from the Properties window and find the proxyAddresses attribute.

Ensure that there is an SMTP address for your Office 365 namespace. Ensure SMTP is in lower case or it will be treated as the primary SMTP address for that user.

Deploying Office 365 ProPlus with Remote Desktop Services (RDS) Session Desktops

I was recently doing  a migration from Citrix XenApp to Microsoft RDS, we had a requirement to have certain applications hosted within the RDS environment. However the organization was in the process of migrating their core communication systems such as Exchange and Skype for Business to Office 365, therefore a traditional RDS installation/license of Office would not be available for the RDS server. It turns out Microsoft have thought of this, and it is possible to install Office 365 ProPlus Click-to-Run within RDS and have multiple licensed users access it using either session-based desktops or RemoteApps.
The RDS deployment is all running on a single server in this test environment, when deploying it I selected the "typical deployment" model, which automatically installs everything on a single server. 


If you are using Office 365 you will probably have AD Connect (or DirSync) running from your Active Directory. If this is the case the licensed users in Office 365 will be known in AD and inside Azure AD which is the identity store for Office 365. It is important to have the users that will be accessing this RDS server (for Office-apps) in the Remote Desktop Users group. By default the RDS wizard populates this with the Domain Users principal. 

Download the Office Deployment Tool https://www.microsoft.com/en-us/download/details.aspx?id=49117 which is required to install Office 365 ProPlus correctly on an RDS server. I don't believe it's possible to do it using the manual download method. When you download and extra the Office Deployment Tool, there will be a configuration.xml file in the extracted folder.
Edit this configuration.xml file with Notepad.
The important lines here for an RDS-based deployment is the <Property Name="SharedComputerLicensing" Value="1" /> this must be added to the configuration file when RDS, or any other kind of shared access to a computer is required. I believe this is also required if you are installing Office 365 ProPlus into VDI, whether it be VMware View, Citrix XenDesktop or even RDS with Hyper-V.

Open up Command Prompt with Administrative rights and do a cd to the extracted directory which now contains the ODT setup.exe and the configuration.xml files.
Run the command setup.exe /download configuration.xml and this will begin the download of the ProPlus binaries that are required. This option is also useful if you are installing ProPlus on mutliple machines and you do not want each device to have to pull down the installation files from Microsoft's CDN.

When the download switch has completed you must run the command setup.exe /configure configuration.xml which will begin the installation of ProPlus based on the information in the configuration file.

The first time each user logs in to the RDS server they will be asked to activate Office. The user's e-mail address which is linked to their Office 365 account is required to do this. They will only be asked to enter this once. 

Tuesday, 6 December 2016

Hyper-V 2012 R2 "The operation failed. Failed to create external configuration store at local path: The system cannot find the path specified...(0x80070003)"

When you try to create a new VM using either Failover Cluster Manager or the Hyper-V Manager you get the following error when you click Finish to actually create the VM. In this environment the new VM function was working correctly last week.

It is a simple fix but it took me a while to work out why it suddenly started happening. It turns out it was related to the Hyper-V Settings and the default location for Virtual Machines. In this example I was using a two node Hyper-V Cluster with shared storage. 

It seems that if you have the default Virtual Machines location set to a local path you will get the 0x80070003 error. When I was trying to create the new VM, I was pointing it to a LUN hosted on a HP StorVirtual. After I set the default Virtual Machine path to point to the same shared storage it worked correctly.

Monday, 5 December 2016

Exchange Server 2013 CU13 Can't mount mailbox database "Unable to mount database. (hr=0x80004005, ec=1108"

Exchange Mailbox Database won't mount with the error "Unable to mount database. (hr=0x80004005, ec=1108" it turns out the transaction logs in this case are also corrupt, so the only option is to perform a hard database recovery. 

The /mh will show you the status of the EDB file, in my environment it was "dirty shutdown" which basically means not all the transaction logs were committed properly. 
  • ESEUTIL /mh ".edb path" - with quotes.
  • cd .edb location (the next command does not work unless you do this)
  • ESEUTIL /p ".edb file"
This perform a hard recovery on the Mailbox Database, in other words it does not attempt to copy in the old transaction logs it simply disregards that data and concentrates on repairing the EDB file. 

Before you try and mount the database it's important you remove the old transaction logs, I recommend moving them to a folder called "old" in their original location. If you do not do this the database will not mount.
  • Mount-Database "database name"
After this the db mounted without any issues.